In this tutorial, we’ll learn how to create a Custom List in Excel. We’ll also learn how to delete the custom list and sort data with the created custom list in Excel.
You can create a custom list manually and automatically. To create an automatic custom list, we’ll use the VBA code.
We are creating and using a custom list to minimize our repeated work and save time. We have also attached a practice worksheet. Click in the below download box to get the practice file.
What Is a Custom List in Excel?
Custom List in Excel means sorting and filling data as users want. It is one of the easiest and time-saving ways for users to input the same data repeatedly instead of manual entry.
Suppose, you are working in a departmental store, and you frequently use a specific order of data for products, departments, or any other categorical data, you can create a Custom List. You can easily fill or sort data in Excel if you create a predefined Custom List.
This feature is especially beneficial for users who regularly work with repetitive data patterns.
Here are some practical applications of the custom list in Excel.
- Consistency of Data Entry
- AutoFill Series
- Sorting Data
- Creating Chart Axis Labels
- Grouping PivotTable
- Formulas and Functions
- Named Ranges
- Database Functions
- Drop-Down Lists in Data Validation:
- Creating Template
1. Using Advanced Excel Options to Create Custom List in Excel Manually
We’ll use the Advanced Excel Options to create a custom list in Excel. To create a custom list, firstly, we’ll pop up the Custom Lists dialog box and then create the Custom List and apply that list in our Excel file. Following the practical steps to create a custom list.
- Open an Excel workbook and click on the File tab.
- Hence, click on the More option ⇉ Options.

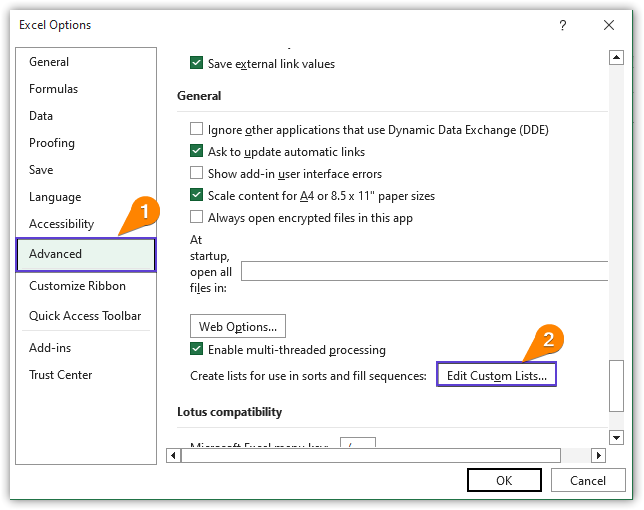
- As a result, the Excel Options dialog box will appear ⇉ Choose the Advanced option ⇉ Click on the Edit Custom List option.
- Again, a new dialog box named Custom Lists pops up.
- Choose NEW LIST from the Custom lists drop-down list ⇉ Type your desired custom list in the List entries typing box ⇉ Add ⇉ OK.
- As a result, you will back to the Excel Options dialog box and again press OK.
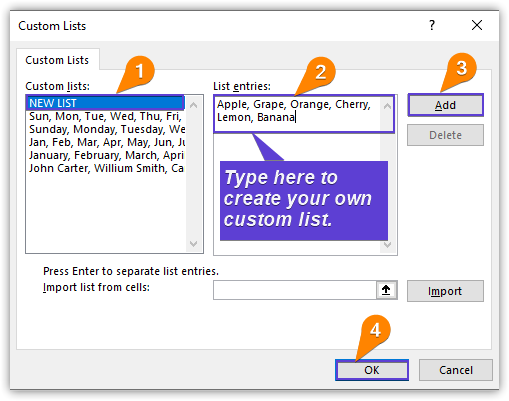
- Finally, we created a custom list.
- Now, we'll check whether our custom list works or not.
- Select any cell. We have selected cell B3 and type Apple.
- Place your cursor at the right-bottom corner of cell B3 ⇉ The Fill Handle(Plus(+) symbol ) icon pops up ⇉ Press and drag the Fill Handle icon downward.

- As a result, you will get your desired custom list like the following image.

2. Execute VBA Code to Create a Custom List in Excel Automatically
In this example, we’ll use VBA code to create a Custom List in Excel. VBA code helps you to create an automatic Custom List.
- Press the Alt+F11 keys.
- Visual Basic Editor window pops up ⇉ Go to Insert tab ⇉ Module.
- Write down the following VBA code and save it with the .xlsm extension.
Sub Create_Cutom_List()

Application.AddCustomList ListArray:=Array("Almond", "Peanut", "Cashew", "Pistachio", "Macadamia", "Hazelnut")

End Sub- Press the F5 key to run the above VBA code.
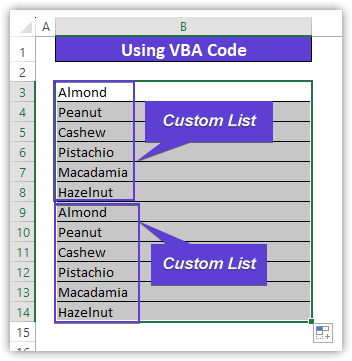
- Select cell B3 and type Almond.
- Use the Fill Handle icon like the above example to create the custom list.
How to Delete Custom List in Excel
Using the Custom Lists dialog box to delete a custom list is one of the easiest ways in Excel. Appearing the Custom Lists dialog box, follow the first step of the first example.
- Select any list from the Custom lists drop-down list that you want to delete ⇉ Delete.

- As a result, a warning message pops up ⇉ Press OK to delete the selected list permanently.

How to Sort Data Using a Custom List in Excel
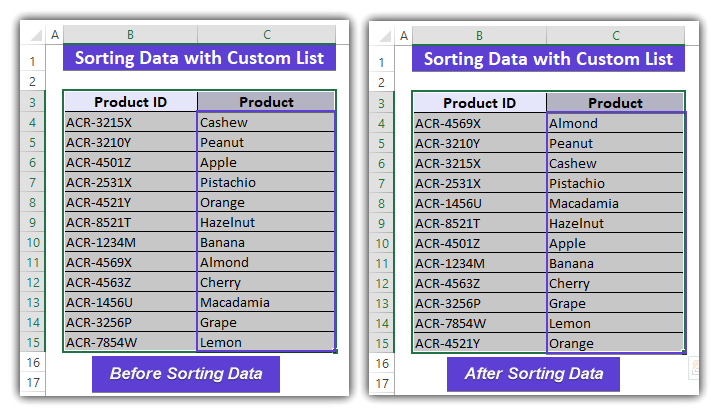
In this example, we’ll learn how to sort data using a custom list in Excel. This is one of the easiest ways to Sort data by using a custom list. You can sort data with a built-in custom list or your own created custom list.
- Select cells B3:C15 ⇉ Go to Home tab ⇉ Editing group ⇉ Choose Custom Sort from the Sort & Filter drop-down list.

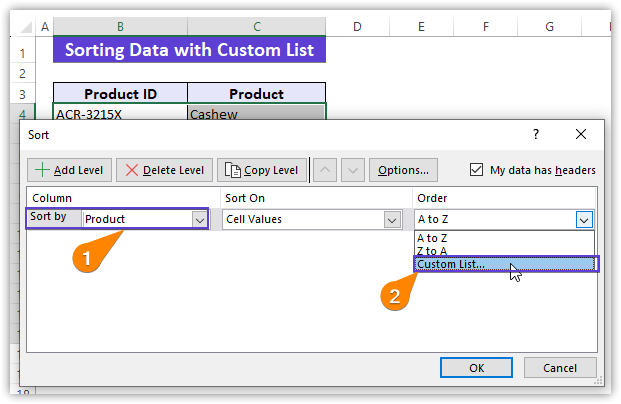
- As a result, the Sort dialog box pops up ⇉ Choose Product from the Sort by column ⇉ Click on the Custom List from the Order drop-down list.
- Again, a new dialog box named Custom Lists appears ⇉ Select any custom list from the Custom lists drop-down list ⇉ OK.
- After that, you will back to the Sort dialog box and from that click on the OK button.

- Finally, you will be sorting data with a custom list.
Conclusion
We have learned how to create a custom list from the above discussion and sorting data with the created custom list. We can also learn how to delete the created custom list in Excel. If you have any queries or suggestions about this article, leave it in the comment section.
Tags: Range